Help Guide
Replacement Kitchen Doors
Introduction
Our favourite sofa looks old. It is still very comfortable, but the fabric is not current, it is even worn and has some broken. It is time for renewal. Shall we upholster or buy a new one? Well, the truth is that your sofa isn´t that old. Its skeleton is as strong as the first day, it is still comfortable and, if we upholster it, it will be like new at a much lower cost while respecting the environment, since the best way to recycle is to use things again.
Look and you will see that your kitchen is made up of cabinets covered by doors, drawer fronts, side panels and other components. All these components are what really give style to your kitchen. Until today if our kitchen was already obsolete, not very current and from another time, we had always thought that the only option was to remove it entirely and change everything, which is not only very expensive, but is also quite annoying and inconvenient procedure.
Ezzy, through this guide, offers you a renovation that consists of replacing the doors of the existing furniture with completely new, modern and updated ones, reusing the existing units and replacing only the components that give style to your kitchen. This renovation, without a doubt, will be a re-release that will make your kitchen a new space at a price much lower than the total cost of replacing all the installation.
This is quite common today in countries such as England, the United States or Germany, among others, where it began to be done in the mid-90s. Replacement Kitchen Doors is a concept of renovation that was born as a practical idea, fast, clean and economical.
All companies must have a social purpose. The Internet allows us to reach you. Our website is aimed not only at smart shoppers, but at a growing demand from practical people and some DIY enthusiast, who are looking for help and advice on how to carry out their projects. In this guide, Ezzy wants to help you through the process from measuring to setting up your new kitchen doors using only basic tools and little DIY skills.
The moments of crisis help us to wake up and change our perspective. Maybe you had thought to change your entire kitchen, but it is not the best time to make that heavy investment, or you are going to rent but the kitchen puts you off. In tough times, think twice before embarking on costly home improvement projects. Not only do we have to find a more practical, economic and ecological alternative to installing a completely new kitchen, but there are jobs that we can consider doing ourselves.
- When carrying out any DIY project, safety should always be your priority and all care must be taken to use tools safely.
- This guide is copyrighted and may not be distributed or reproduced without the author's written consent.
- Although the author and publisher have made every effort to ensure that the information in this guide is correct at the time of publication, the author and publisher do not assume and hereby disclaim any liability to any party for any loss, damage or interruption caused by errors or omissions, whether such errors or omissions result from negligence, accident or any other cause.
Content
- Main Components of the Kitchen
- Component Locations
- Information we Must Provide
- How to Measure the Doors
- Position and Measurement of Hinge Holes
- Hinge Types
- Drawer Fronts
- Ovent Front
- Dishwasher Door-Panel
- Side Panels & End Shelf Units
- Cornices & Pelmets
- Pliths
- Fillers
- Doors for Glazing
- Handles
- Carcasses
Key Kitchen Components
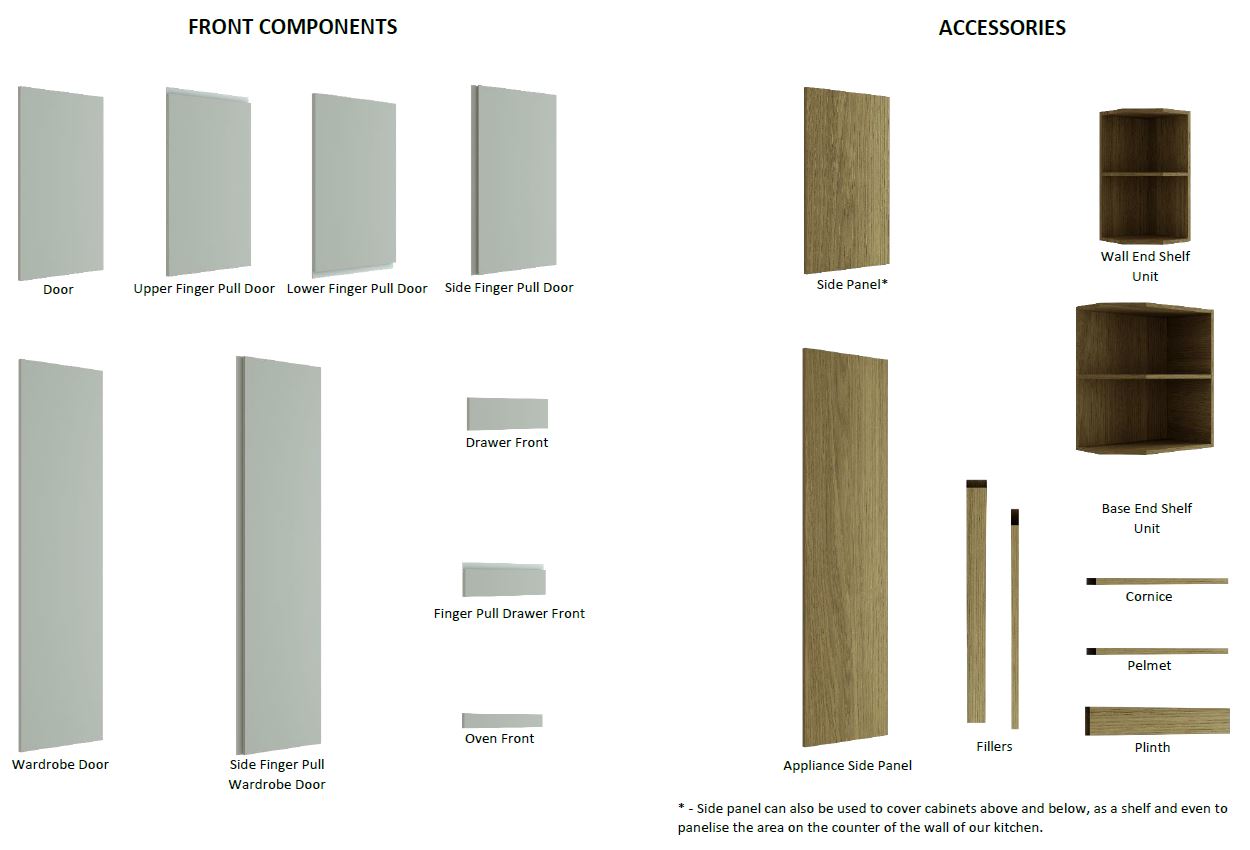
Component Location

Information We Must Provide
- Doors – Drilling position (left hand door, right hand door or top hanging door), exact measurement of the door and distance of the hinge holes from the edge (top, bottom or side) to the centre of the hole. Note, only for doors with a finger pull, we must also give the position where the finger pull is located on the door, either: upper, lower or lateral finger pull.
- Drawer and oven fronts - Measurement of the piece (height and width)
- Panels and fillers - Measurement of the piece (height and width)
- End shelf units - Measurement of the piece (height, width and depth)
It is important to make sure that we do not forget to write down any door, drawer front, oven front, panel or filler. A practical way to write down the measurement of the doors and others is to write down the information on post-it (sticky notes) that you should paste on each of the parts to be replaced.
Another way to write down the measurements and the rest of the information is to use the order form attached at the end of this document on page 22. Once we have written down all the parts to be replaced, we proceed to make our order online.

How to Measure Doors
The measurement of the doors, drawer and oven fronts, and other parts to be replaced is simple.
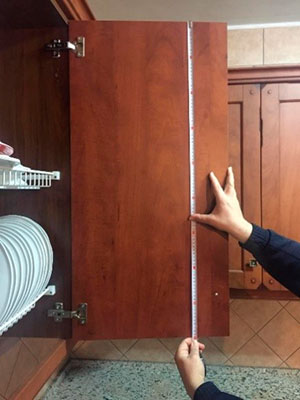
The first thing to keep in mind is that you must measure the door, not the cabinet. The doors and drawer fronts will always be a few millimetres smaller than the cabinet. So if, for example, we have a cabinet 70cm high by 50cm wide, the door will measure a few millimetres less depending on the country of manufacture of the original components (in Spain it would be approx. 69.7cm high by 49.7cm Wide). This allows a margin of a few millimetres between the doors to facilitate the opening and closing of the doors.
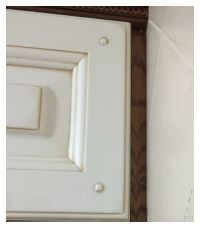
The second thing to keep in mind is that doors are measured from the back, never from the front. Depending on the door design, we find that some can have a molding that makes the measurement accuracy difficult from the front. However, on the back the door always has right angles that facilitate accurate measurement.
Third and last, we need to give an exact measurement to the millimetre. Since it is a matter of changing old doors for new ones of the same size, it is important that the new ones have the same size. Therefore, if the door is 49.7cm wide, do not make the mistake of rounding to 50cm.
Position and Measurement of Hinge Holes
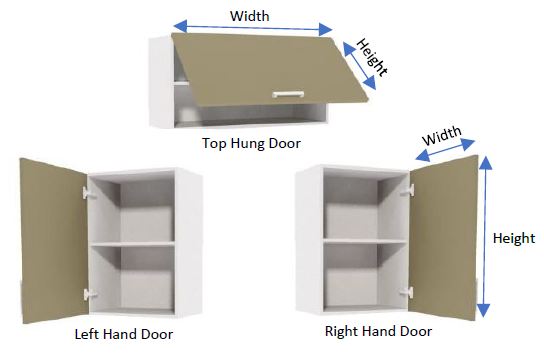
The position of the hinge holes will depend on the opening of the door, that is, if it is left hand door, right hand door or top hanging door. This information is essential for the correct manufacture of the door to replace.
Typically, a door has two or three hinge holes. But depending on the height of this we can find that there are doors with up to five hinge holes. To measure the top hole, we will always measure from the top edge of the door to the centre of the hinge hole.
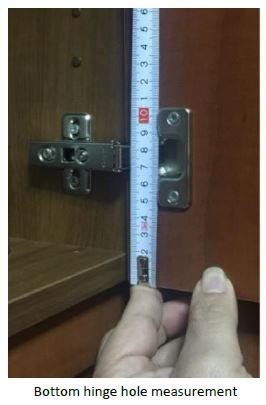
On the other hand, to measure the bottom hole we will measure from the bottom edge of the door to the centre of the hinge hole. (Example, the image on the side gives us a measurement of 7.5cm). For the rest of the holes it is recommended to measure from the edge closest to the hinge hole. This information will be requested during the purchase process on our website.
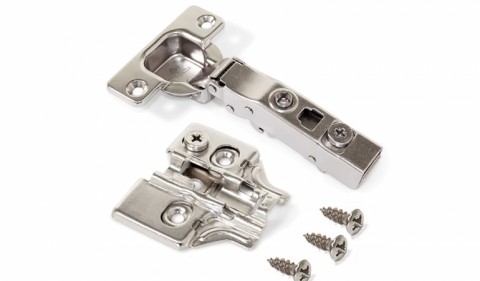
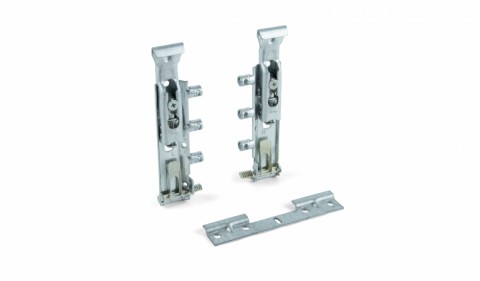
Although it is not essential for the change of look of your kitchen, it is highly recommended that when you decide to change the doors you also change the hinges, since these, without a doubt, will be quite deteriorated by the use and passage of time. Hinges and other accessories are pieces that have undergone a significant technological advance in both quality and comfort in recent years. The most important advance is the brake system on both hinges and drawer guides, which will not only protect these parts from unnecessary knocks and future deterioration, but you will also see annoying noises disappear. If you finally decide not to change your old hinges, don't worry because the diameter of the hole maintains its standard measurement of 35mm. So, your old hinges will be alright on your new doors.
Hinge Types
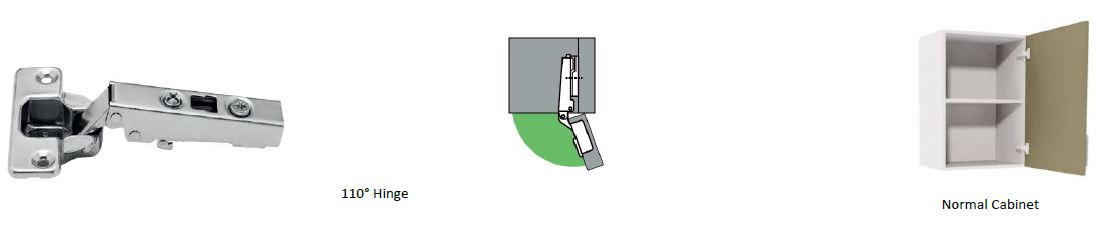
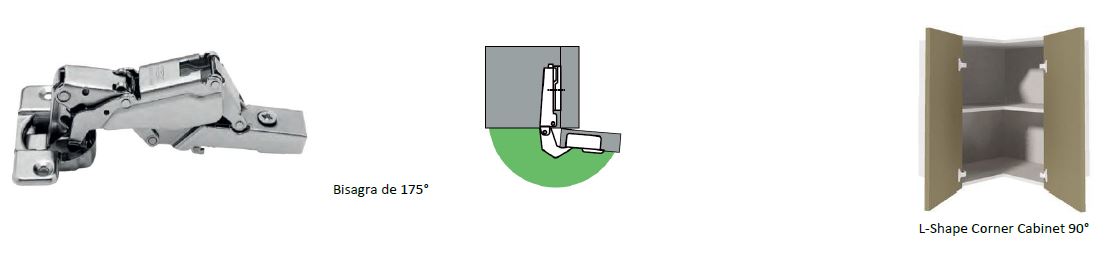
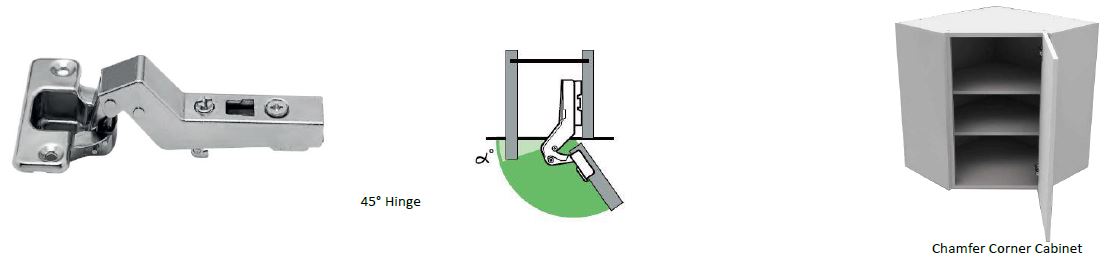
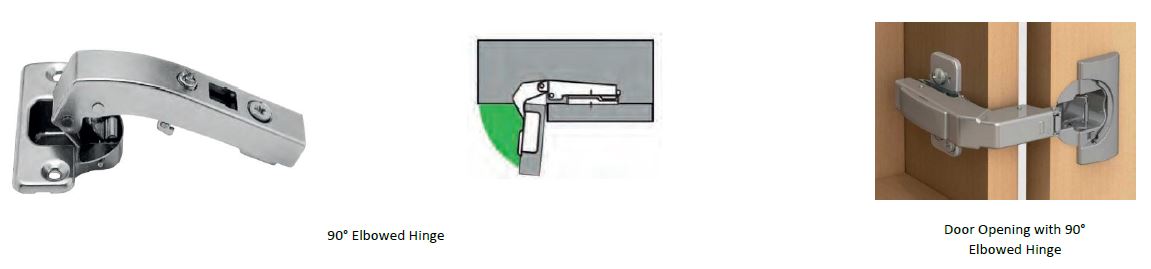
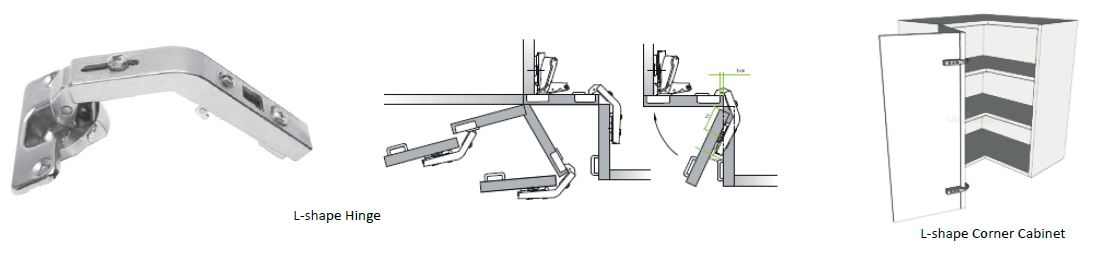
There are many types of hinges. However, in this guide we will only show the most used hinges, which are the 110°, 175°, 45°, 90° elbowed and the hinge for L-shape corner angle.
If you are going to replace the hinges, you must consider the degree of opening of the door. This will depend on the position of the door in the distribution of your kitchen.
- The most common hinge is the 110° hinge used for most cabinets. This hinge provides an opening that slightly exceeds the lateral line of the cabinet.
- The 175° hinge is designed to provide a wide opening to both doors of the L-shape corner cabinet and should only be used for that unit.
- The 45° hinge is only used for the corner cabinet door in chamfer since it provides an extra opening angle necessary in this unit since it has a single door that is usually 40cm wide.
- The 90° elbowed hinge is commonly used in modified corner cabinets where, for reasons of space, the installation of a L-shape or chamfer corner cabinet is not possible. In this case, the door in the closed position would be in line with the cabinet side and this hinge, with its adapted shape, allows us to make a 90° opening.
- This hinge is used for joining the two doors together in the L-shape corner angle in combination with the previously mentioned 175° hinge so that the 175° hinges would be fixed to the cabinet while this first door would support to the second through the corner hinges. This type of hinge is in disuse since its laborious and inadvisable installation, since having joined two doors we would be very overweight in the main hinges of 175° causing continuous misalignments in the doors and exerting significant wear on both the doors and on 175° hinges. It would be advisable to replace this type of hinge with the installation of 175° hinges on both doors, one on the left and one on the right, fixing the two directly to the cabinet.
Finally, it should be noted that all these hinges have a screw adjustment system for both height and distance to the cabinet and distance between doors, which will allow us to leave our new doors fully framed.
We recommend viewing the demonstration videos in the "Help" area of our website and / or on our YouTube channel.
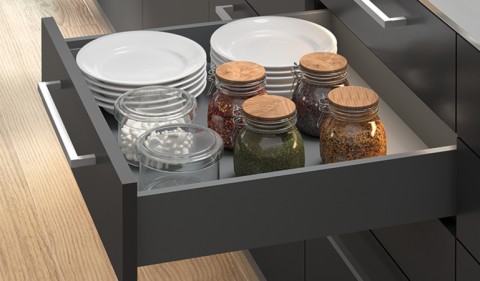
Drawer Fronts
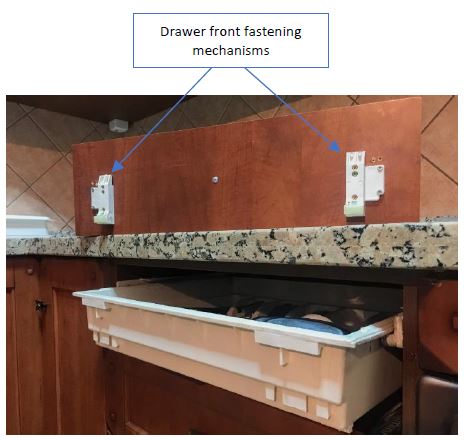
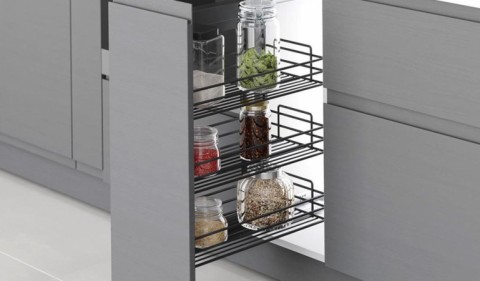
As previously mentioned, measuring drawer fronts is a very similar process to measuring doors, taking this from the back of the piece. Unlike the doors, the drawer fronts do not have hinges, although depending on the existing drawer body and if it is a normal drawer or a pan drawer type, some fastening pieces will be screwed that will adjust the front to the drawer body. Logically, when changing our previous drawer fronts for the new ones, you must screw the existing mechanisms copying the exact arrangement on the replaced drawer front. In the case of pan drawer fronts, we will also find a hole to insert the bar that gives depth to the pan drawer body. You will have to use a drill with a wooden bit of the same diameter as the bar, an action that is not much difficult.
Oven Front
In this case we will have to measure from the front since it is a piece fixed from the inside of the unit and requires the removal of the appliance. The oven front is a piece that is usually located on the oven depending on the model. Some oven models may not require front installation. Its function is merely decorative since it covers the space between the oven and the bottom of the worktop. Both for the dismantling of the previous one and for the installation of the new front we must extract the oven by unscrewing a screw on each side that fixes this to the cabinet. Previously and for security we must disconnect the electricity from the home installation. Once the oven is out and after having disconnected the controls of the cook, (if they connect from the oven) we unscrew the front from inside the unit and on the opposite we will screw the new oven front fixing it to the cabinet.
Dishwasher Door-Panel
The process of changing dishwasher door-panel is very similar to the drawer front. This door-panel also does not have hinges and, like the drawer front, they will have screwed fixing plates that will fit the door to the front of the dishwasher. You should also copy the exact arrangement of the mechanisms in the old door.
Since there are many brands and models of panel-mounted dishwashers, we recommend reading the assembly instructions for the door-panel of the corresponding model.
Side Panels & End Shelf Units
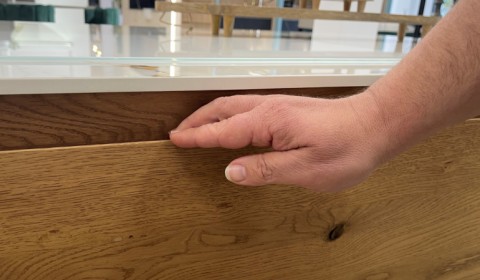
The function of these pieces is very similar. Both are decorative pieces that cover the sides of the cabinets in most cases. Although it is true that its replacement is not essential for the renewal of our kitchen, the existence of panels in our kitchen is synonymous with quality and good design and, therefore, its replacement is highly recommended.
As far as the end shelf units are concerned, it should be noted that their use in the installation of new kitchens today is very limited since in contemporary design straight lines and minimalism prevail. If you wanted to eliminate this unit, you have two options: replace it directly with a side panel or add a cabinet with a door that is the same height and width as the space it occupies. In that case, remember to add a side panel to this new unit.
To replace these parts, we will have to locate the screws that fix these to the adjoining cabinet from the inside of it, which are usually hidden by the shelves inside the cabinet. For the removal and replacement of these parts, it is important to use clamps that temporarily hold the part to the cabinet since, when removing the screws from the inside, the panels or shelf units could fall.
It is recommended the installation of the new panels or end shelf units to be carried out before changing the doors. It should be clarified that, although we call them side panels since it is their most common function, we can use panels to cover cabinets above and below and even panelise the area on the worktop of the wall of our kitchen. Any of these will be manufactured to the required measure.
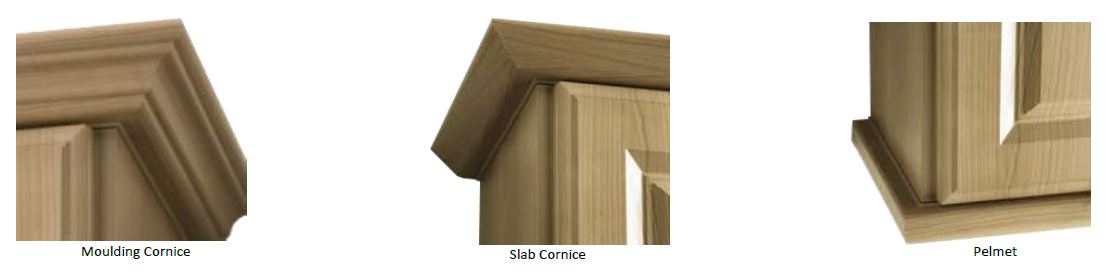
Cornices & Pelmets
These accessories have a decorative function basically and there are a variety of shapes: round, square, flat, with moulding, etc. Although in contemporary design they are less used, it is true that it is still an option that also contributes design and quality.
The cornice is a piece that runs along the top of the tall furniture and the pelmet is a kind of skirt that runs along the bottom of the wall furniture and can hide the lighting installation under the furniture.
If you decide to renovate your kitchen you have several options to replace these elements:
- You can eliminate both cornices and pelmets since their installation is not essential for the new image of your kitchen.

- Replace these elements with flat pieces that will add a touch of class to your kitchen. (These pieces are available on our website)
- Substitute both pieces by panels covering the cabinets both above and below.
The measurement of these pieces will depend on the replacement system you choose.
If you decide to install new cornices and pelmets, you must measure taking into account that each cornice or pelmet supplied is 2.50m long, 10cm wide and 22mm thick. This will lead you to have to cut and adjust each of the sections yourself. This option is ideal if you prefer mitre cuts in corners.
Since both the cornice and the light holder are flat pieces, you can also order pieces to the size (height X width) in the panel section. This will make it easier for you to cut the different sections.
Any of the options previously exposed will allow the installation of the different lighting systems under cabinets if you wish.
Plinths
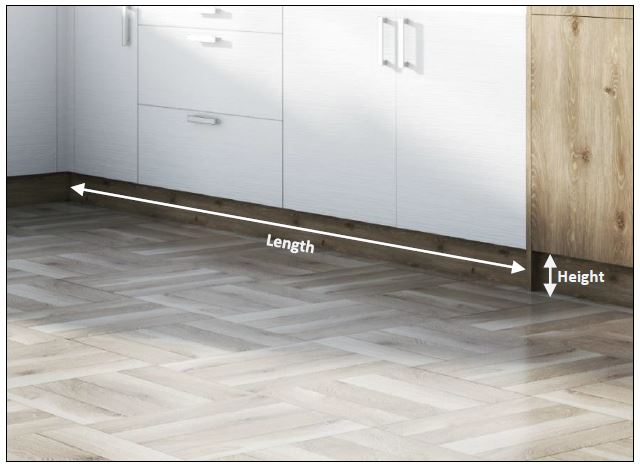
These pieces are used to cover the space between the floor and the bottom of the base units. There are several materials used for the installation of these, being able to find baseboards of aluminium, marble or stone to match the worktop, etc. Since there is also the possibility of having plinths to set with doors or panels, on our website you will find a section to order these. For this you must provide the measurement of height and length.
Fillers
Since most kitchens are custom fitted, the space is not always exact, and the corners do not always square at 90°, the use of fillers is usually necessary. The fillers are tailored interlining pieces that are used to fill or finish spaces making our kitchen a totally bespoke installation. These pieces are normally located at the ends of the furniture set where the cabinets meet the wall. They will not always be necessary for the installation of the kitchen, but their use is quite common.
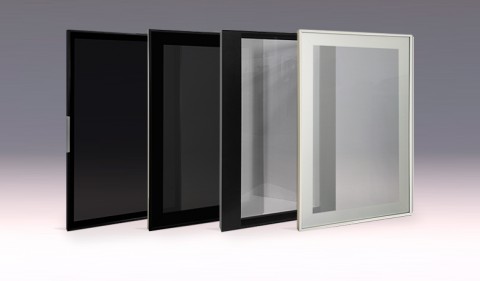
Doors for Glazing
These are glazed doors that give a very important decorative touch to the kitchen. Its treatment in terms of dimensions and hinge holes is identical to a normal door. Although there are doors for glazing doors of the same model and design as normal doors, aluminium doors for glazing are very common in natural aluminium and in different colours, but the most common colour is black.
In the case of aluminium door for glazing, these are served with a handle built into one of their profiles. To order, it is necessary to indicate the type of door opening and choose between a with bottom or side handle door.
Due to the number of transport incidents and the variety of glass type, we only serve doors for glazing without glass.
The glass should measure 6mm less in height and width than the total measurement of the frame and should be 4mm thick. For example, if the door measures 69.7cm X 39.7cm, the glass should measure 69.1cm X 39.1cm.
The installation of the glass is simple, you will only have to unscrew two corners of the frame to be able to remove one side and insert the glass through the guide where it will be placed. Once this action has been performed, the side is screwed back and ready.
The use of tempered glass or with a safety system that prevents accidents due to cuts in the event of glass breakage is highly recommended.
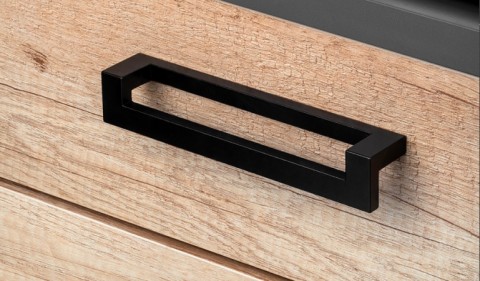
Handles
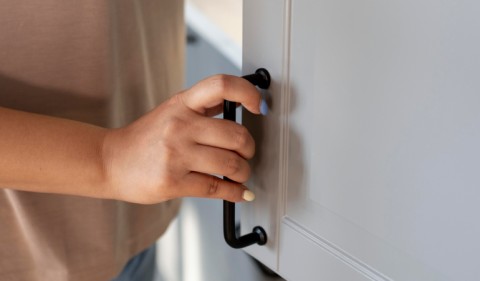
The main options you can find are handle, knob and finger pull. Although it is true that these first ones are the most popular options, the finger pull doors have been gaining ground, supposing this a practical advance in design and quality.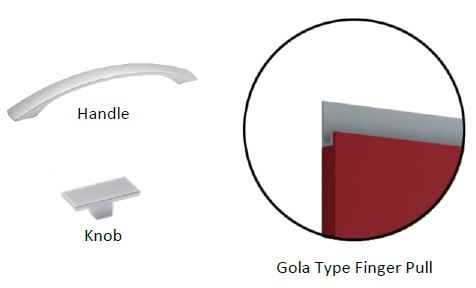
In the case of handle and knobs, keep in mind that the fitting of these should be done once all the doors and drawer fronts of our kitchen are replaced. For this we recommend making a template that allows you to easily mark the holes for passing the fixing screw on the doors and drawer fronts. It is important that when performing these holes, a martyr piece of wood is used for the back of the door to avoid an ugly splintering to the drill bit output from hole.
However, if you decide on a door model with a finger pull, the handle will already be installed as part of the doors and you will not have to carry out the installation work on it.
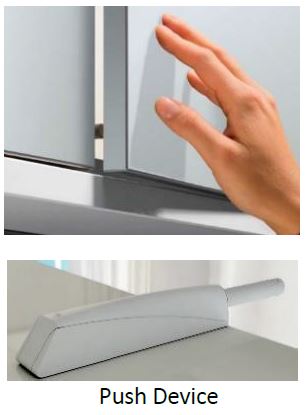
As previously mentioned, such is the importance of the handle that, even its absence, represents a maxim in modern design. Just because the handle is absent in the kitchen design does not mean the doors can't be opened. For this, special hinges or easy-to-install devices called "push" are used, which are screwed to the cabinet internally, which allow us to open the door by applying slight pressure on it. Due to its efficiency and cost, the "push" is a great option.
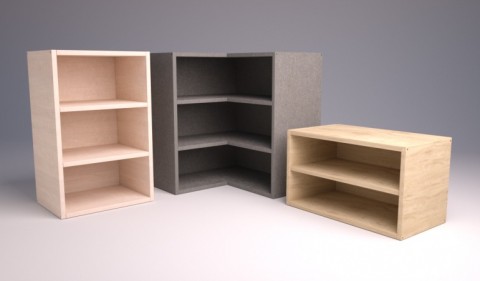
Cabinets
Although the idea is to change the other components without having to change cabinets, we can be the case that we want to replace or add an extra unit. To do this, we will briefly review the different types of cabinets. This will allow us to have basic knowledge on the subject that, without a doubt, is not superfluous. It must also be said that the cabinets are standard size elements, but easily modifiable if necessary and it is very common for cabinets of a larger size to be adjusted to the required dimensions.
There are several types of cabinets in the kitchen installation. Next, we will list them and tell you their peculiarities.
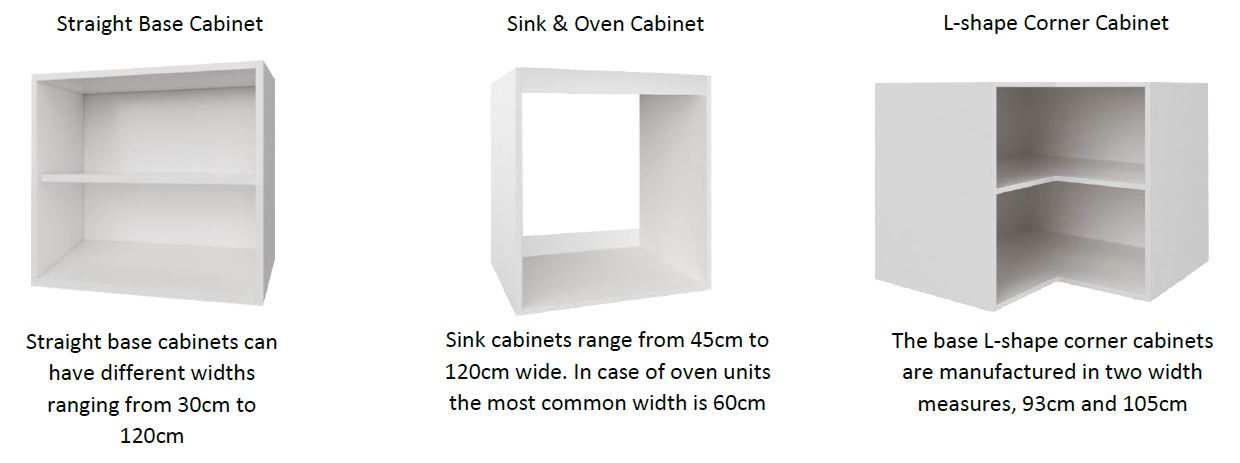
- Base cabinets: These are the units located in the lower part of our kitchen and which serve as the base for the worktop. Height adjustable legs are installed on all base cabinets, which, in any case, must be purchased separately. It should be noted that the Spanish standard sizes are: height 70cm and 80cm (the latter more recent) with different widths and always a depth of 58cm. Within the low units we must differentiate between the following:
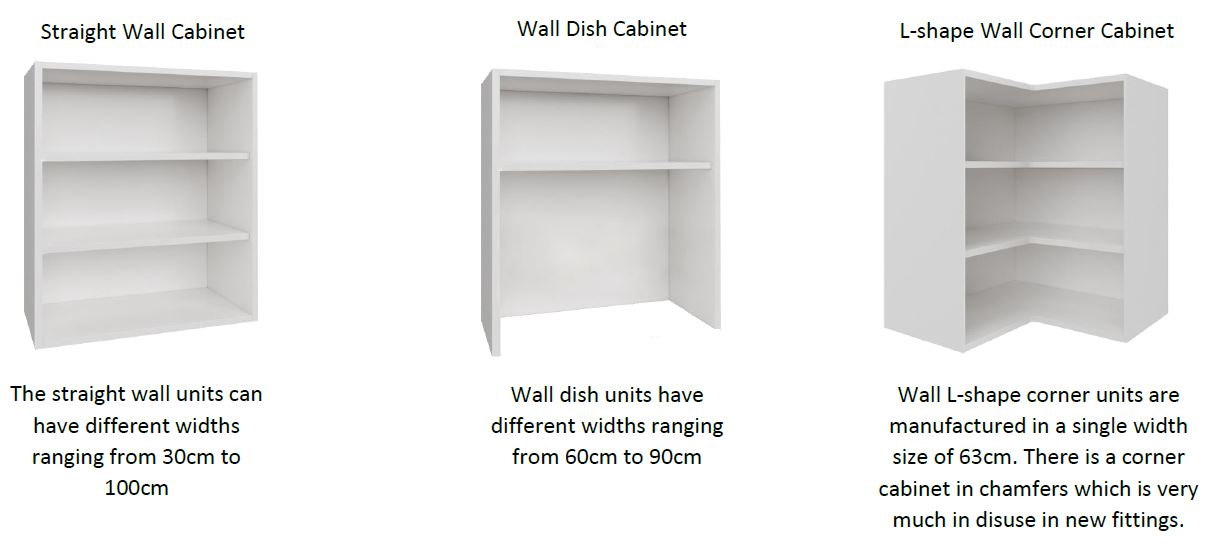
- Wall cabinets: As their name describes these cabinets are located on top of the kitchen installed on the wall. These are hung by a hanging bracket that allows some height adjustment. The two most common standard measurements in Spain in height are 70cm and 90cm with different widths and a fixed bottom of 33cm. Within the wall units we also highlight the following:
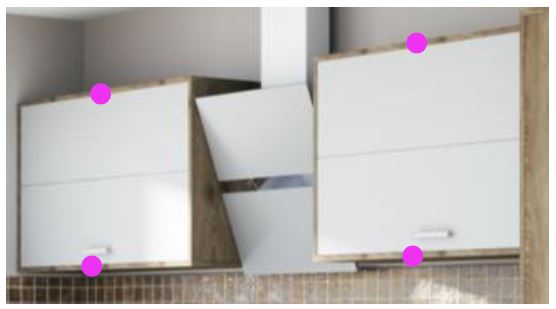
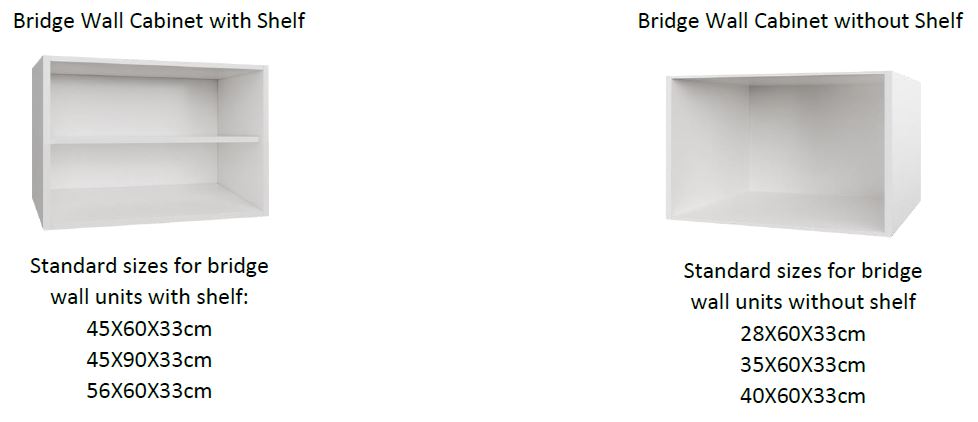
- Bridge wall cabinets: Bridge wall units are commonly used as a bridge cabinet over the refrigerator, although in new installations they are increasingly used in minimalist-style kitchens. This cabinets, due to their sizes, can give us a lot of possibilities. There are 5 standards heights: 28cm, 35cm, 40cm, 45cm and 56cm. The standard widths are 60cm and 90cm and its depth is fixed at 33cm like the rest of the wall cabinets.
- Over worktop cabinet & Tall semi-column cabinet: As its name suggests, the over worktop unit is placed directly on the kitchen worktop. This is a unit most commonly used in spacious kitchens. Its only standard size is 130X60X33cm. On the other hand, the tall semi-column unit is a cabinet that is installed on the ground with its corresponding legs. Its dimensions are 130X60X58cm.

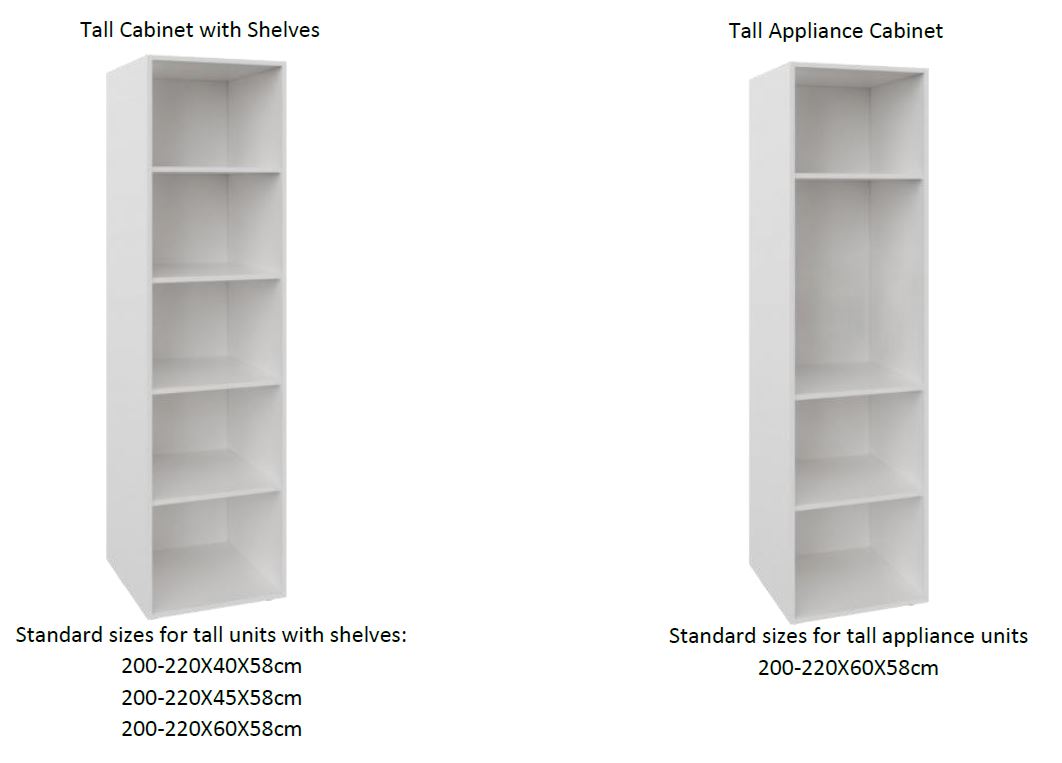
- Tall cabinets: Tall cabinets are units that, due to their dimensions, run vertically through the entire space from the base to the highest line of the furniture. Height adjustable legs are required for installation. Their main function is that of storage, although they also allow the installation of appliances such as ovens, microwaves, coffee machines, etc. The standard sizes for height are 200cm and 220cm, with width 40cm, 45cm and 60cm and depth 58cm.